
Introduction
In today’s data-driven world, businesses often use multiple databases, whether hosted on AWS or on-premises. As organizations change, the need to migrate data between these databases becomes more important. That’s why AWS has a service for this called Database Migration Service (DMS). This service is designed to streamline the process of data replication across all kinds of databases, including relational databases, data warehouses, NoSQL databases, and more.
This article will be focused on data migration between two serverless databases using DMS. This approach not only simplifies the migration process but also improves efficiency. First, we will take a look at the key components involved in such a migration. After that we will dive into the required roles and security groups. And in the last section you will read about the way to keep the traffic in your private network.
Components

DMS Endpoints
When migrating data using DMS, one of the steps is to set up the DMS endpoints for both your source and target databases. Think of these endpoints as the gateways that allow DMS to communicate with your databases.
At this stage, you can configure various database-specific settings. This includes selecting the right database engine type and setting up the credentials to the database. For security reasons, it’s highly recommended to use AWS Secrets Manager. This service not only helps you avoid hardcoded credentials but also provides a secure and scalable way to manage your access credentials. And you can implement access controls more effectively. If you prefer, you can also configure your own AWS Key Management Service (KMS) key instead of using the key managed by AWS.
If you decide to set up a replication instance, which is an optional step, you will have the added benefit of being able to test your database connections directly in the DMS endpoint. This can speed up your process significantly. By using a replication instance, you can quickly verify that your DMS endpoint connections are working as intended before diving into the actual replication process. You will notice that when you test the DMS endpoints via serverless replication it will be a lot slower. Because serverless replication first need to setup resources and gather metadata, and that will take a while. That’s why testing through a replication instance can save you time.
Replication instance
When you’re migrating data with DMS, the replication instance can also be a DMS component that you will need, even though it’s not required for serverless replication. Think of the replication instance as a dedicated EC2 machine that you deploy within your VPC and associated subnet group. To set up your replication instance, you will need to make a few decisions. First, you will need to specify the instance class, which essentially determines the computing power you will allocate. You also need to set your storage options and decide whether you want to run your instance in a multi-Availability Zone (AZ) setup, or stick with a single-Availability Zone (AZ) configuration. For this use case the storage and instance class can be set to the bare minimum, because you are only going to use it for testing. Because of this, multi-AZ will also not be necessary.
Serverless replication
Serverless replication is the DMS service that will perform the actual data migration. This service allows you to configure data replication in a flexible and efficient way. There are three types of replication you can choose from:
-
Full Load: This option is ideal for one-time data migration. Once the data transfer is complete, the process will automatically stop.
-
Full Load and Change Data Capture (CDC): This method combines a one-time data load with ongoing replication of changes. It continues to capture and apply changes until you decide to stop it manually. Additionally, you have the option to schedule when CDC starts or stops.
-
Change Data Capture (CDC) only: This option focuses only on the continuous replication of changes, without performing an initial full load of data. It’s perfect for environments where you only want to track and replicate ongoing changes.
When setting up your serverless replication, you will need to specify the DMS endpoints, choose your replication type, and configure settings related to transactions. In these transaction settings, you can decide what action to take with the target table. You can select to do nothing, drop it, or truncate it. You can also choose to include Large Object (LOB) columns if needed.
The configuration process also includes a table mappings section, where you can specify which tables or databases (schemas) to include or exclude from the replication process. There is also a optional part where you can configure to transform your data during replication.
You will also need to set up connectivity and security features to ensure that your data is transferred safely and efficiently. You can choose between multi AZ or single AZ configurations, along with the specific AZ that will work for you.
Because this is a serverless replication service, you have the flexibility to select both minimum and maximum capacity units in terms of virtual CPU and memory. The actual capacity used will automatically adjust based on the workload of the replication process.
IAM Roles

Before you can setup the DMS components, you will need to create a couple of Identity and Access Management (IAM) roles and policies. When you attempt to create a DMS resource, you may see warnings regarding the VPC role and the CloudWatch role.
If you click on the permissions link provided in the warning, AWS will present you with the necessary trust and permission policies specified for your account. These policies are designed to work seamlessly right out of the box, making the setup process more straightforward.
It is important to name the IAM roles exactly as dms-vpc-role and dms-cloudwatch-logs-role. If the roles are named differently, they will not be recognized. Then the warnings during the DMS resource creation will remain.
Secrets Manager
If you want to use Secrets Manager in your DMS endpoint configuration, you will need to create an IAM role specifically for that. When you select a secret and opt to create a new IAM role, you will have the option to click on View permission details. This action will display the necessary trust and permission policies required for your setup, specified to the selected secret and your account ID.
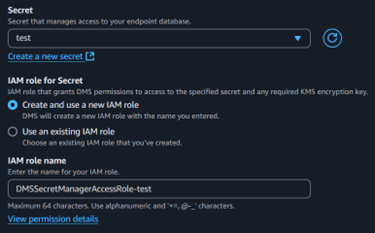
It’s important to note that you will need separate secrets for each of your databases. Each secret will contain information such as the host and identifier, along with potentially other fields, which will differ between the two databases.
However, if the two databases are not strictly separated, you can modify the permission policy to include both secrets associated with the different databases. This adjustment allows you to use a single role for both DMS endpoints, streamlining your configuration and management of the IAM roles in your environment.
Security Groups
In the configuration for serverless replication, it is essential to specify a security group. If you are using a replication instance, you will also need a security group for that instance. However, you can combine both requirements into a single security group for simplicity.
For your security group, you will need to establish one or two rules. The first rule is an egress rule that specifies the port(s) of the databases you are replicating. The most commonly used ports for various databases are as follows:
• 3306 for MySQL • 5432 for PostgreSQL • 1521 for Oracle • 1433 for SQL Server • 3306 for MariaDB • 27017 for MongoDB • 9042 for Cassandra • 5439 for Amazon Redshift
The second egress rule is optional and allows access to the Secrets Manager API. If you want to enable this, you will need to permit egress traffic on port 443.
In both cases, you have the option to specify your own VPC as the destination if you prefer not to allow traffic to the internet. This improves security by restricting access to only the resources within your VPC.
Private Connection
As mentioned earlier, you may prefer to keep your traffic off the public internet for security reasons. By default, some AWS services route traffic over the internet. To change this, you can create a VPC Endpoint that allows you to access an API within your own VPC that is not accessible from the internet.
To enable DMS to communicate with Secrets Manager securely, you can create a VPC endpoint specifically for this purpose. During the creation of the endpoint, you will need to select the VPC to which it will be attached. After selecting the appropriate VPC, it is important to choose the same subnet(s) that are configured for your databases.
Another crucial network setting is the “Enable DNS Name” option, which must be enabled to allow DNS resolution for the VPC endpoint.

Once you have selected the previously created security group, you can proceed to create the VPC endpoint. After the endpoint is created, you will be able to view its DNS names. Make sure to note down the first DNS name, as this will be required for your DMS endpoint configuration.
In the DMS endpoint settings, you will find an option to expand the endpoint configurations. By doing so, you can enable “Use endpoint connection attributes.” Here, you will need to fill in the following attribute:
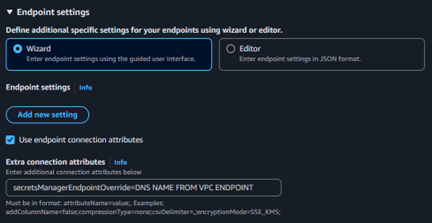
By entering this configuration, you inform the DMS endpoint to use the Secrets Manager VPC endpoint, ensuring secure and private communication with Secrets Manager within your VPC.