
When building a platform on AWS you often end up using numerous services that need to interact with one another to create a workflow. In this blog I’ll show you how to orchestrate such workflows using AWS Step Functions.
In my previous blog I introduced workflow engines and explained what they are, how they work and what considerations to take when deciding to use a workflow engine over custom orchestration. One of the workflow engines mentioned in that blog is Step Functions, which is a cloud-native serverless orchestration service provided by AWS.
From my experience, AWS Step Functions are good in orchestration if you’re using AWS native technology, as they seamlessly integrate with most AWS services. If you’re not using an AWS native landscape don’t worry, there’s plenty of vendor agnostic alternatives out there. In this blog I will discuss what AWS Step Functions are, how to define, execute and monitor your workflow using AWS Step Functions and how it can be monitored.
What AWS Step Functions are
AWS Step Functions is a cloud-native workflow engine provided by AWS. It’s serverless, meaning that all infrastructure is managed and provisioned by AWS. All we must do is define our workflow using Amazon’s state language (ASL, a JSON-based language), provide some configurations, and run our workflow. Note that a single workflow is also called a “state machine” within AWS.
There are two types of workflows that can be defined:
- Standard workflows
- Express workflows
Standard workflows are used for long-running workflows which are durable and auditable. Their history is preserved for 90 days after the workflow run and they employ an at-most-once delivery model, meaning that your tasks/states are never executed more than once (unless explicitly specified as we’ll see later in this blog). Furthermore, a standard workflow can run for at most one year (a single run), supports a lot of service integration patterns (more on this later) and is billed per state transition.
Express workflows are more suited for high-volume event processing (for example IOT data ingestion, which gets triggered very often but doesn’t take a lot of time to process). They can only run up to 5 minutes and employ an at-least-once model. This means that every state in your workflow (or even the workflow as a whole) is guaranteed to be executed once but can potentially be executed more than once. Because it can be executed more than once, everything you’ll orchestrate using express workflows should be idempotent (able to be executed more than once with the same inputs without leaving the system in an inconsistent state). They are billed by the number of executions, duration of the execution and the memory consumed.
For more details on the differences between the two types of workflows, I would recommend going through the AWS documentation on the subject. For the remainder of this blog, I’ll focus on standard workflows as this is suited for most use cases. Also, after understanding how standard workflows work it’s relatively easy to work with express workflows.
Defining a workflow
Now that we understand what Step Functions are let’s dive into how they work. I’ll start by going over the building blocks of a state machine, followed by managing input and output parameters and error handling.
There’s two ways to define a workflow within Step Functions. The first is by defining your workflow in code using the ASL, the second is to drag and drop your workflow using the visual editor. I’ll start by explaining how to do it in code. Since the visual designer is also based on the ASL, understanding the foundational code before leveraging the designer can be helpful in your understanding of Step Functions.
Let’s start by explaining how workflows can be defined using the ASL. As with all things code, the first thing we’ll create is a simple Hello world workflow to show the basic workflow definition:
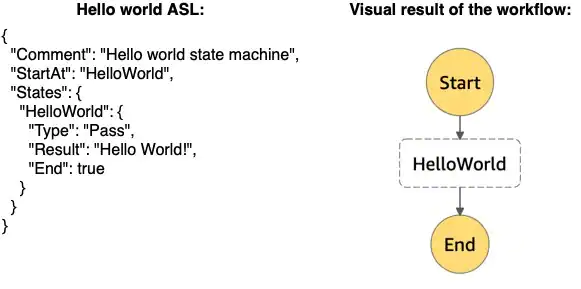
Figure 1: Hello world workflow defined in ASL with visual result
Let’s go over some of the keys in the example above. The first thing we add is a “Comment”. Comments are optional and can be added to each step to clarify what’s supposed to happen. It’s always good to add comments and keep them up to date so that other developers (and you in the future) knows what the intent of the code is.
The second line is an important one, it’s the “StartAt” key. StartAt determines which state we should start with, denoting the first step in our workflow. Finally, there’s the “States” key, whose value is a dictionary containing all states (different steps/tasks) of this workflow. Note that you can put your states in any order you like, as the order does not impact the validity of the workflow and each state refers to its successor by name. However, for maintainability purposes I would recommend keeping your states in chronological order, which makes it more natural to read, understand and maintain.
Each state is an element in your workflow. There are multiple types of states, which are denoted by the “Type” key. Besides the “Type”, they can have the optional “Comment” key and must have either an “End” key (with “true” as value, indicating that this is the last state of the flow) or a “Next” key (with the name of the next state as value). The types of states can be divided into two categories: “Flow” states and “Action” states.
Flow states are steps that don’t perform any work, instead they are used to define special types of flows, like branches or loops. The following flow state types are present in Step Functions at the time of writing:
- Choice: add if-else (if) logic, allowing the workflow to branch out based on a condition
- Parallel: add parallel branches, all states within the parallel state are executed in parallel
- Map: adds a for-loop, iterating over the input of the state
- Pass: Do nothing, can be used to add transform results or as a placeholder for future functionality
- Wait: add a delay for a specified time
- Success: Stop and mark the workflow execution a success
- Fail: Stop and mark the workflow execution as failure Action states on the other hand are steps that perform work. All of them have the state type “Task”. Tasks can be used to delegate the work to other services, for example: Invoke a Lambda function, start an AWS Glue job, publish an event to SNS, start the execution of another step function. Recently AWS also added the possibility to perform API calls on AWS services directly from step functions using tasks, for example to perform an S3 CopyObject or even create an IAM policy.
Using and manipulating input parameters
Defining a static workflow is one thing, but we often want to parameterize it so that it can act based on the inputs (or outputs of previous steps). Whenever we start an execution, we have the possibility to provide a JSON as input. For example:
{
  "hello": "world!",
  "foo": {
    "bar": "baz"
  }
}
We can access this input using the “$” symbol (so $.hello would access the hello variable) and pass it to our steps, for example when invoking a Lambda.
There are a lot of cases where the provided input isn’t structured in a way that all steps can use it. For such cases AWS Step Functions provides us with two keys to manipulate the input:
- InputPath: used to select a subset of the input of a step
- Parameters: used to manipulate the format of the input and pass task specific configurations to an action
Let’s start with the most straightforward one. As mentioned, the InputPath is used to select a subset of the provided input to a step, discarding everything except for that specific path. An example of how this works can be found in Figure 2.

Figure 2: Example of input manipulation using the InputPath
Although this works quite elegantly, there are scenarios where we need more control over how we structure the inputs to our step. If our Lambda expects the input to contain all provided information in a flat structure, we need to do more to the input JSON than just select a subset. To facilitate this there is the “Parameters” key, which allows us to manipulate the input structure. Figure 3 shows how this can be used, note that the “structure” field is populated using a hardcoded value for example purposes.
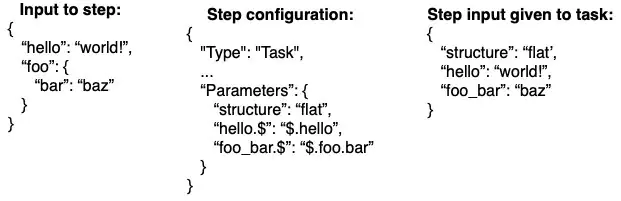
Figure 3: Manipulating inputs using the Parameters.
Next to transforming the input structure, the “Parameters” key is also used to give extra configurations to actions, for example specify the bucket and object to copy with the S3 CopyObject action.
Using and manipulating output parameters
Besides the input provided when executing a workflow, we can also leverage the output of steps as input to steps that come after it. By default, the output of a step overrides its input data, essentially replacing the “$” variable. Even though this can be beneficial in some cases, often we want to have more control around this. Luckily, we can do so with the following 3 keys:
- ResultPath: can be used to combine the steps input with its result
- ResultSelector: manipulate the step result to a structure more beneficial to us
- OutputPath: take a subset of the output of a step (after ResultPath and ResultSelector have been applied)
The ResultPath key is used to prevent the result of a step from overriding our previous inputs. Instead, we can define a path within our input where the result should go, combining the two. It does so by specifying on what path of the input the result should go. Also, if we don’t want to use the output of a step at all, we can disregard it by setting the value of ResultPath to null. Figure 4 provides an example of the ResultPath, showing both the input and result of the step and what the result will be after applying the configuration.
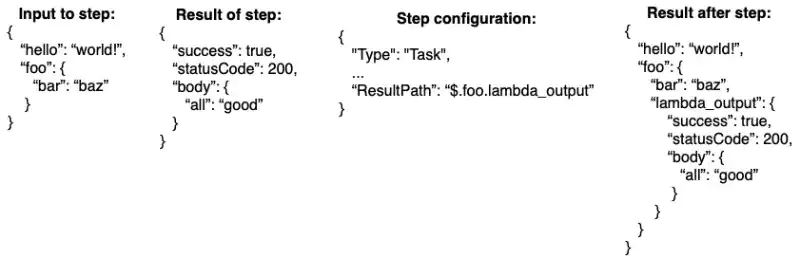
Figure 4: Example of the ResultPath configuration, combining in-and outputs
Looking at the result above there’s parts in there that we might not be interested in, like the statusCode field and maybe we even want to flatten out the rest. To get a cleaner output we can leverage the ResultSelector. The ResultSelector allows us to restructure the steps result completely to our desire, even adding extra information if necessary. Figure 5 provides an example of how this would work, combined with the ResultPath of before.
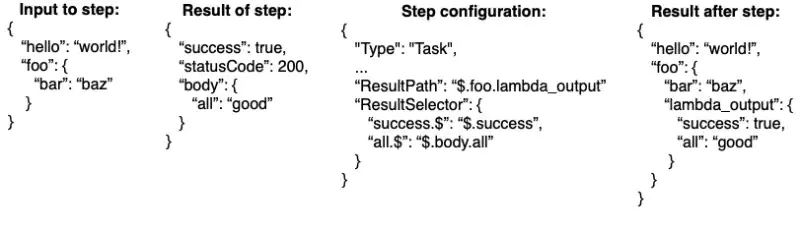
Figure 5: Extending our ResultPath example with the ResultSelector
Finally, the last configuration we can use to manipulate the output of a step is the “OutputPath”. The OutputPath key works like the InputPath in that it’s used to select a subset of the output to continue with. However, as the name implies, it operates on the output of the step (note that output comes after the result parts, meaning ResultSelector and ResultPath go before OutputPath). Figure 6 provides the last example on how this works, combining the ResultPath, ResultSelector and OutputPath in one.
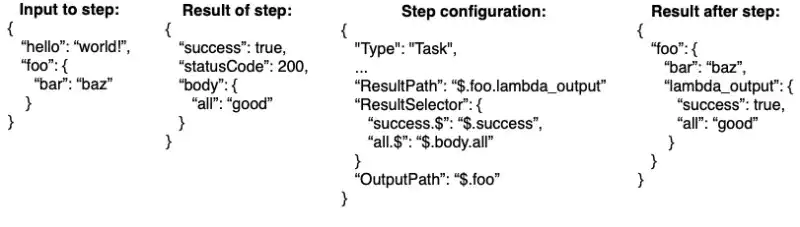
Figure 6: Combining ResultPath, ResultSelector and OutputPath to have full control over our output
There are two special cases where the output differs: the Map and Parallel types. Since these perform multiple tasks within them (the explanation above holds for each task in it), they will both output a list containing the full output per iteration/branch.
As you can imagine, by combining InputPath, Parameters, ResultPath, ResultSelector and OutputPath we have full control over how we want to structure and format our inputs and outputs per step. While defining your workflow, you can leverage the data flow simulator to model the inputs and outputs. This tool can help setting the right configurations to manipulate the inputs and outputs to your needs.
Error handling
As with all things in life, the task states (actions) can fail. Luckily, AWS Step Functions has built in ways to deal with these issues, namely retries and catches.
The Retry configuration allows us to define the retry behavior upon failure. This can be configured to behave differently on different exceptions (for example: Retry once for a ServiceException but retry 3 times for a SdkClientException). Per retry we can specify the following:
- IntervalSeconds: how many seconds to wait before retrying the first time
- BackoffRate: multiplier with which the interval seconds increases with every attempt
- MaxAttempts: maximum attempts before calling it a failure
Do make sure that the task you are trying to execute is idempotent when adding the retry behavior. If this is not the case your state after retrying might end up being corrupted/inconsistent.
While retries are great for handling intermittent failures (think of network glitches, API throttling limits etc.), sometimes things simply fail due to bugs (or to be implemented features as I like to call them). In such cases we can also decide to handle the error more gracefully than just a hard failure using the catch configuration. Catch allows us to branch out to unhappy flows based on a thrown exception. Just like with the retry configuration, you are free to define multiple branches based on specific exceptions. This is handy if we want to do a cleanup after failure, or maybe send an email to our users notifying them that their input wasn’t proper or any other scenario you can think of where graceful error handling is needed.
Note that both retry and catch can be combined for a single step (either for the same exception, or for different exceptions). For example, we can say if an API throttling exception is thrown, retry it 3 times first with 3 seconds interval and a backoff rate of 2.0. After 3 times catch the exception, cleanup any processing done so far and send an email to the team managing the API before failing the step function.
Defining the workflow using the visual editor
As you can probably imagine, knowing all the different configurations for all the different tasks can become quite complex. Also, the JSON definition can grow quite big as well, even for relatively small workflows. To cope with this complexity, AWS provides a visual workflow designer in which you can drag and drop your workflow. I haven’t used it that extensively, but from what I’ve seen so far it works quite well and it’s quite easy to get started with since most configurations for each type of flow/action is well documented.
Executing a workflow
There are multiple ways to execute our workflow, the simplest being doing it manually. You can start a step function manually via the management console (by pressing the “Start execution” button or by using the AWS CLI to with the start-execution command.
Of course, doing it manually is great for testing and for some production systems, but often we want to automate the start of our workflow, for example whenever the user makes a request, or a file is uploaded to S3. Luckily for us, this is possible as well. Executions can be started using the AWS SDK (via Lambda, or some other service), via the API Gateway (trigger by HTTP request), via EventBridge rules and, as mentioned earlier, via other workflows.
Every step function execution has a unique “name”, which is either a generated UUID or a name provided by you when starting the execution. It’s important that the name is unique for the specific workflow, since the history of that run can be retrieved using this name (it’s not even possible to re-use the same name twice as the console won’t allow it and the cli will just return the old run’s response). Next to the name of the execution, it’s also possible to provide input parameters to the execution when starting it.
Monitoring and reporting
After our workflow started, we still need to monitor it to make sure it runs well. The act of monitoring and reporting on our workflows can be done in two ways: automated monitoring and manual. Since it’s best practice to automate as much as we can, I’ll start with the automation, followed by how to do it manually (for debugging for example).
Automated monitoring and reporting
I always recommend implementing passive monitoring tools to have the system tell us about its progress, essentially automating part of the operations. To do so, we can set up the following:
Alarms on failures (or success if you want to be notified by that as well) using EventBridge events with SNS for notifications Use the CloudWatch logs to create dashboards (number of success/failures, average time per step etc.) Use the SDK to extract more details about the run and visualize it in dashboards The first option in the list is to enable notifications based on the completion of your execution. This can be based on both successes as well as failures based on your needs, but I would recommend to at least have it enabled for failures. Getting these notifications can be done using a combination of EventBridge rules/CloudWatch events together with SNS to send out emails (or whatever form of notification you’d like). Figure 7 shows how this can be set up.

Figure 7: Setting up notifications using EventBridge and SNS
Besides getting notifications, creating dashboard can also be useful for reporting purposes. Instead of checking every single execution, we are often interested in aggregated overviews for reporting our performance, SLA management, etc.
We can automate our reports using two approaches. The first is using the metrics and logs already available in CloudWatch to visualize our aggregated information in a dashboard (either CloudWatch dashboards, or if we want to do more customizations use something like QuickSight or another dashboarding tool). This can be used to report things like number of successes/failures, average time taken per step, etc.
The second approach, which is an addition to the information we get from CloudWatch, is that we can extract more custom information from our workflow executions in an automated way using either the CLI (write custom scripts) or using the SDK (programmatically extract more information about the step function run). This extra information can be used to enhance our dashboards and/or reports without us having to actively do anything (except for setting it up of course). From the CLI we can use the get-execution-history command, and from the SDK we can use the get_execution_history method (using boto3 for Python, for other languages the method name might differ). Just like the notifications, we can leverage EventBridge events together with Lambda to automate the extraction of these custom metrics.
Manual monitoring
Now that are reports and notifications are set up, we also need to know how to get more information on the progress manually, for example to get more details on what went wrong after we’ve received a failure notification. To do this, AWS Step Functions provides us with a few things:
- The UI gives us up-to-date visuals on how our workflow is progressing
- Cloudwatch logs can be used to provide us with details on the progress and error messages
Let’s start with the first one. After we start the execution of a state machine (regardless of how we started it), AWS provides us with a visual update on its progress. The UI will show the full state machine, where each step can have one of the following colors:
- White: step has not been started (yet)
- Blue: step is currently being executed
- Green: step has completed successfully
- Red: step has completed unsuccessfully; some exception was thrown that has not been caught
- Orange: step has completed unsuccessfully; the thrown exception has been caught
By simply watching the UI, we can track the progress of our execution. Also, by clicking on each step we can get a detailed summary of its inputs, outputs, time taken to execute the step and, if anything fails, details on the exception. All of this together give us a lot of information about what is happening in more details. Figure 8 gives an example on how this progress is visualized.
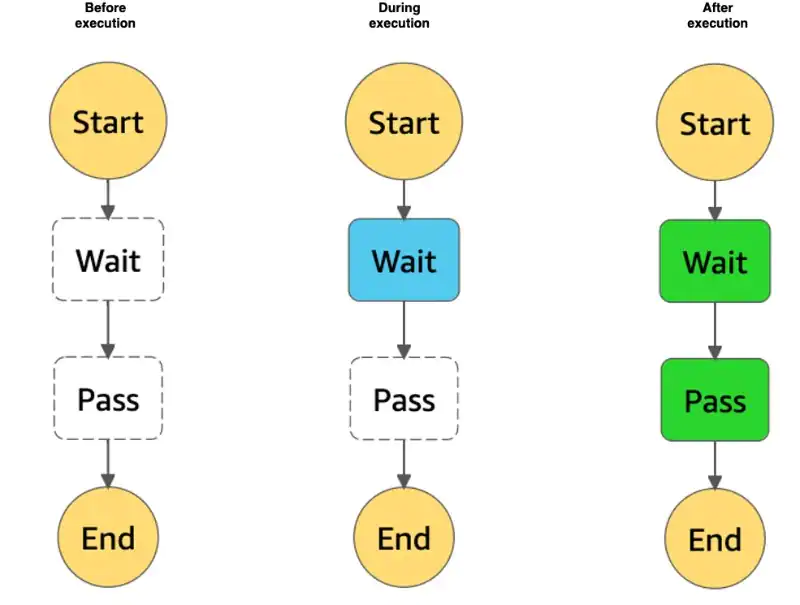
Figure 8: Example of our execution’s progress in the UI
The second approach mentioned is using the CloudWatch logs to monitor progress. When enabled, and I recommend you enable it, all our execution logs will be written to CloudWatch as well. Actively looking at the updates through the logs can be useful in case you don’t have access to view the execution directly (due to legal/compliance reasons for example). The CloudWatch logs will provide similar information as the UI in terms of progress, successes, and failures.
Lessons from production
Before wrapping it up I’d like to share some of the lessons I’ve learned from running AWS Step Functions on production, which can help ease your developments and maintenance of your workflows in the future.
Split big state machines in multiple smaller state machines
When defining your workflow, the ASL can become big. This is due to all the configurations that can be added, and of course all the whitespaces/indents that come with the JSON syntax (often added for readability purposes). At some point your workflow will become unmaintainable simply due to its size. Just imagine having to remove 1 block from a JSON document with over 2000 lines, trust me the indents and forgotten brackets will be something to cry about at that point (speaking from experience here). Instead, try separating your state machine into multiple smaller state machines which are also easier to manage (for example, if you have one Parallel state with X tasks inside, followed by a Map state with Y tasks inside: create 1 state machine for the Parallel and 1 state machine for the Map). Since state machines can start other state machines (and await their result) you can simply add a “main” state machine which calls all the smaller ones in order.
There are two big benefits to splitting a big state machine into multiple smaller ones:
- Making this split results in multiple smaller files which are often easier to update and keep you sane, whilst retaining the order of your workflow through the main state machine
- It’s easier to change and adapt individual child-step functions as long as its inputs and outputs remain the same. Using the example above, we can easily change the whole content of the Parallel child state machine (making it another Map or sequential or whatever) without affecting the bigger flow.
- Multiple files means that multiple people/teams can work on the workflow without interfering with each other if the inputs and outputs remain the same
Of course, there is a downside to this approach as well, which is that if inputs/outputs change, the change must be made in multiple places (at least the main step function providing the inputs/receiving the outputs and the child step function in which the change has been made). Also, understanding all details of the full workflow means going over multiple files. Do keep these drawbacks in mind when finding the right balance for the split of your big workflow.
Be specific in what errors to retry
Even though it can save a lot of time just retrying on the general exception (catch all) and continue happily with our lives, I wouldn’t recommend doing so. The first obvious reason is that if your task isn’t idempotent, retrying on an error after saving means that your data is written twice after the retry. Now you might think, we can simply just make our tasks idempotent and then do the retry on all exceptions right? You can of course, but you probably still don’t want to and here’s why. If your task fails on a bug (think of a null pointer exception for example), retrying it 3 times won’t make a change as the issue won’t just magically disappear from your code (oh how much I’ve wished for this). Meanwhile the retry attempts will cost you resources which could either be saved or used for something else (that’s not failing). Therefore, it’s good practice to retry only on the errors that can be caused by unfortunate events, rather than bugs in code (network hiccups, API throttling etc.).
Be careful with errors in parallels and (concurrent) maps
Whenever a step fails due to some exception that has not been caught, the state machine execution will fail. This failure has been implemented a fail-fast approach, which is helpful as you probably don’t want to waste any resources if your system failed. However, there is one scenario where this can be risky. Whenever a Parallel or a Map with concurrency enabled is running and 1 of the tasks fails, this fail-fast approach will kill all other tasks that are running. Since these other, non-failing, tasks get killed mid-way, there is a chance they will leave your system in an inconsistent state (for example, they wrote 3 out of 5 files, then get the kill signal) or even a corrupted (tasks has written half a file and got aborted) which can be problematic. There are however a few ways to deal with this issue.
The first, and probably most important one, is to make your tasks idempotent. After fixing the issue you can simply run the full state machine again with the same parameters, leaving the system in a consistent state after the second run. Of course, this means that in between the first and second run the system is inconsistent. Depending on the type of system this can or cannot be acceptable. In case of partial files/writes this solution can still lead to a corrupted state.
A second solution is to catch all exceptions for all tasks within the map or parallel and lead them to a pass state. By catching the error, the task won’t be marked as failed (but as caught instead) and all other non-failing jobs will continue as usual. After all tasks in the map/parallel have succeeded, add another map containing only a choice step. This choice will check the output of the map/parallel to see if it contains any error messages. If so, perform a cleanup of everything that’s inconsistent/failed and call a “fail” state afterwards, marking the state machine run as failed. This approach is more time/resource consuming since the cleanup will only happen after all tasks have succeeded but will guarantee a consistent and uncorrupted state afterwards.
The final solution I will discuss is to have all your tasks be transactional. This way, both the failed as well as the aborted tasks will revert to their previous state before shutting down. Of course, this too has its drawbacks where guaranteed consistency comes at the cost of availability in distributed systems (check out the CAP-theorem and ACID vs BASE for more on this). Also, since the tasks run independently of each other in a map/parallel, there’s no guarantee that a task hasn’t finished already before the first issue. In such scenario no kill signal is given (as the task already finished) so no revert is happening for that specific task.
Pass the execution name to each task
I mentioned earlier that whenever you start your execution, you can provide a unique execution name (or it will be a random UUID if nothing is provided). It is recommended to use pass this execution name to all your tasks as an input parameter and use it in the logs of the executing services. By adding this to all logs, tracing what happened with a full execution is easier (filter on the execution name). During one of my projects, we even went a step further, and not only passed the execution name to all tasks, but also added it to the data we stored. This way we could trace back every row of data to a specific execution, giving us full traceability in what happened where whenever something went wrong. Do be sure that your execution name is not anything sensitive when propagating it to all tasks as we don’t want to have sensitive data in our logs.
In case you’ve split up your step function into multiple smaller child step functions, orchestrated by a main parent step function, I’d recommend using the main parent step function’s execution name if present, otherwise if it’s not present, use the child step function (in case the child was run in isolation for some reason). Since the parent step function spans multiple step functions, each with their own tasks, this will allow you to trace the full flow of an execution of your workflow using a single ID. Note that this does mean that the parent step function execution name needs to be passed to all children and then to the tasks within the children to ensure consistency.
Version the ASL using version control
I would always recommend putting the resulting ASL in a version-controlled repository, as this can be used to go through the peer-review process as well as preserve historic versions. When using the visual designer, which is only present in the management console, we can’t really version control it. Luckily the designer does output its results as the ASL, so even when designing your state machine using the designer, we can copy its result and put it in version control. Also, even though the designer really helps, as the state machine grows bigger, making small changes (like changing the order/links of steps) is probably easier to do directly in the ASL.
Wrapping it up
That wraps up this blog on AWS Step Functions. We’ve covered what they are, how to define and execute them, how to monitor and some tips and tricks to help you along the way. This should give you everything you need to start running your first workflow on AWS. Before finishing, I’ve created a repository with multiple examples of everything I’ve discussed during this blog which you can use for more practical examples. I hope you liked it and stay tuned for future blogs!